2021 is off to a flying start, the S15 roll cage is really starting to take shape so I thought I would check in with you guys and give you an update to the progress I have been making on it.

As you have probably figured this isn’t my first roll cage but it’s definitely the best I have ever produced.

It seems fitting as this car is culmination of many things that I have learnt over my career, after removing it from a 10 year slumber its been treated to a lot of time and effort and the roll cage is something that positions it firmly for its racing future.

To make my life a little easier I made up a chassis JIG that allowed the car to be moved about the workshop and also elevate the chassis to a hight that made getting in and out a lot easier. We filmed the process and will have a worked example on this in our ETSFab rollcage course.

When I was first figuring out this roll cage design I looked upon many different motorsport disciplines, I wanted this chassis to have the ability to compete in any form of motorsport in the FIA world. Through my research for the ETSFab.com roll cage course that features this build I learnt a lot on design and function of a roll cage. In a previous post I detailed the 3D scanning that we completed on the chassis, Matt Hill got busy in Solidworks and designed the intended roll cage from my sketches.

From here I was able to order the 1020 CDS Mild Steel tube in 44.4mm and 38.1mm in diameter, both with a 2.6mm wall thickness and get into making the structure.

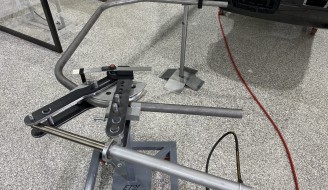
Before this happened though I needed a new bender capable of the task, my trusty upright bender is a great tool but I wanted to produce roll cage bends a lot more effortlessly and after a lot of design we were able to produce our very own horizontal tube bender.


Just days before beginning the roll cage build I broke a few ribs on some dirt jumps, I was extremely happy that I set this up with a hydraulic ram and foot pump, it certainly makes life a lot easier.


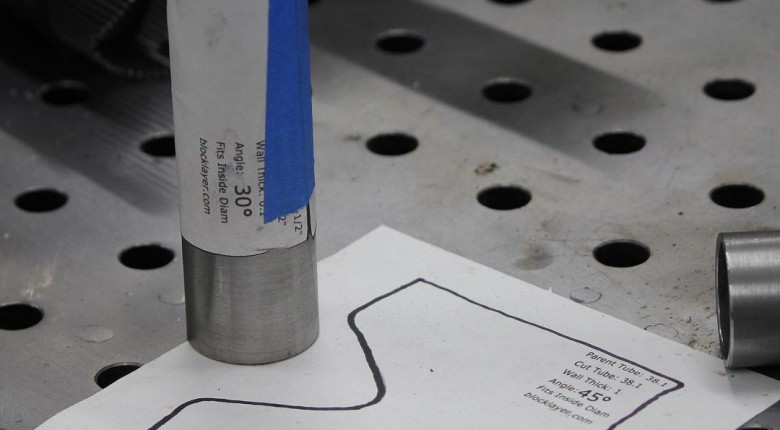
After completing a test bend and producing a bend template I was able to measure the chassis and work out the dimensions for the main hoop.


With the bender all completed and my design finalised I started work on the main hoop, its the backbone of a roll cage and a good starting point. We designed and printed this digital readout which made bending extremely accurate.


The bender combined with the new digital angle readout and clamp on angle gauge allowed me to produce a perfectly fitting and aligned main hoop with perfect bends.


A roll cage is only as strong as the floor its mounted too so some 3mm cold rolled steel makes up the front footings, making these is streamlined by first completing templates out of 1mm polycarbonate.


Because I am TIG welding this cage into the car its important that I make the gaps as minimal as possible to streamline the welding process, usually this wouldn’t be too much of a problem but welding thick to thin material in an awkward position needs as much preparation as possible.


I take a lot of inspiration from WRC builds, as they work on these cars on often rocky ground they use these sill panel lift tubes to lift and secure the car in the service area. I have started seeing them used on more and more race cars especially those with complicated aero, because I am not ruling out a time attack event in the future I thought it would be a great idea to integrate these into the footings of the roll cage. I used 1.25 inch chromoly tube (offcuts from the BMW chopper) that telescopes 1″ solid bar 150mm deep into the chassis.

My Hilux build used air jacks and although they have been a fantastic addition to the chassis the amount of effort in making them, plumbing them and supplying them with Nitrogen Vs the amount of time they are used seems like a bit of a waste. This are a much simpler solution.

From there it was a mix of cutting, bending, notching and perfecting.


Theres a process that takes place throughout all of this work and its detailed in our ETSFab roll cage course.

Roll cages are not difficult to make once you understand the process and each time a tube slots into position perfectly its a great feeling.


They do require some planning though, I fully weld each tube that will be overlapped by another and leave room to drop the cage through the floor to facilitate final welding. This means the door bars are not added till the top is welded and then the cage is lifted up onto the footings.

With all of that welding completed it was great to see the cage become a permanent feature of the car.


TIG welding is so enjoyable, of course it’s the preparation that makes it enjoyable, without great fit up and cleanliness it can quickly become a nightmare.

I have always loved the stock S15 dash design, keeping this was difficult with this cage design but somehow it fit with a few mm to spare.

The moment came to mount the Bride Maxis seats into the car.


I feel old when I say it but I think seats have lost a lot of their style, these were a nightmare to track down and I managed to find the last few Bride Maxis III seats in existence, no longer in production these seats suit the era of car and the direction I am heading with it.

The harnesses wrap around the harness bar at the perfect hight, I am using the Bride rails that came with the seats and I am happy with the position of them.

I have a heap of gussets to make for the roll cage, the door bars along with the window reinforcements, the roof X and the rear X all need gusseting, ill be forming curved gussets that will give the cage a great shape that will compliment the seats and the dash, three items that really add form to the inside of a race car.

I’ll get back to the job now but thanks for reading and I look forward to showing you the finished product.
Want to learn how to do your own fabrication projects? Start with a free, live lesson. Enroll now.

![S15 Roll Cage Completion, New Tools and More | Today At ETS [#UPDATE 007]](/assets/Uploads/blog-posts/1054bd779f/engineeredtoslide_164102057_244467224077235_4705884765943523367_n__FillWzMyOCwxOTBd.jpg)
Comments
No one has commented on this page yet.