This BMW Chopper build has been a wild ride, it has been over a year since I unboxed a brand new BMW R Nine T Racer and removed the heart of it for this project. BMW’s support was instrumental in making this project a reality but don’t be fooled, this is still a budget operation. From the very beginning, I had a good understanding of BMW’s heritage, I grew up on the back of one with my dad being a big advocate for the German manufacturer.
In this article: The Design Process | Bringing It To Life | The Final Product

The Design Process
Wheels are everything for me, in the beginning, this build was meant to be pretty simple but then the invite for the Born Free Show arrived in my inbox and everything went into hyper mode. For over a year I had spent a lot of time thinking about the wheelset. I had an up and coming engineer Matt help me to draw up a snowflake front wheel. He spent many hours perfecting the design for the 5th axis machining process to hog it out of a solid billet of Aluminum. The design was exceptional but the intricacies proved a real nightmare when it came to the proposition of machining. It was estimated that a 5th axis milling machine would spend nearly 30 hours in two setup stages on each wheel alone. That combined with a $600 billet piece of aluminium and a pre-removal process of material on the lathe would cost me around $12,000 for a pair of wheels. Even if I was to be able to afford to do it, I had no promises that it was going to turn out OK so I figured maybe I could get a blank forged in China and then machine it here to remove some cost. Still, this was to cost around the same amount after shipping and I couldn’t control the process so I needed to think about a few things and I spent months doing so.
I began to think about all my options and continued to gain inspiration from others who had been in this position, being a keen BMX’er I remembered something about the MotoMag and thought I’d dig into that a little more. I contacted Joel from Dsgn.co who was drawing and rendering some insane 3d chopper stuff. I took some measurements and sketched some designs, he simplified a few things and sent me some renders which I spent hours looking at. I couldn’t help but think about the possibility of fabricating these.


Bringing It To Life
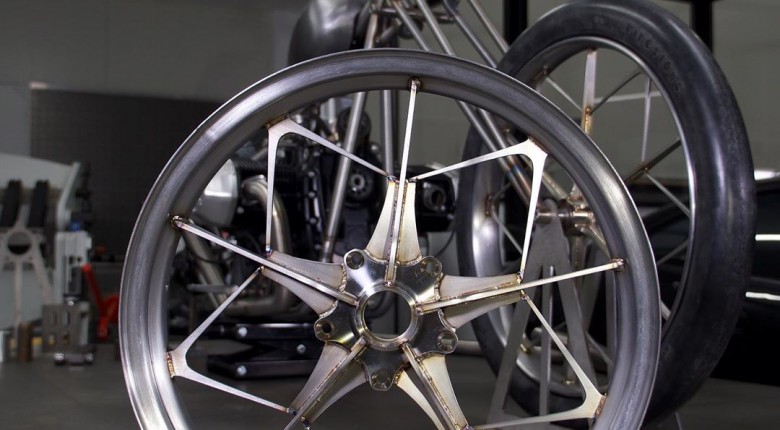
The more I thought about it the crazier I got about the idea. I had Matt draw up the wheel in CAD, we sent the rear hub design to a local CNC engineering shop to make it out of stainless steel, the spoke design to the laser cutter and the result is what you see above. There were some small changes were needed to make everything fit perfectly and I machined the front hub to suit these. After hand polishing the spokes with a file and some Scotch-Brite I took a deep breath and decided to make all of these bits one. Believe me, it's not easy making it all uniform but the precision of Matt's design and the laser cutting accuracy certainly helped.

I decided to slot everything together and get an idea for the finished product so that I could make alterations to my design if needed. I toyed with the idea of the spokes creating a dished effect, it would look great but the shift from the asymmetrical design scared me and once I went this direction I would never be able to go back.

Setup on the aluminium uprights, with no filler material I completely fusion-welded all internal spokes 20mm at a time, allowing them to cool between sessions. With heat the spokes would grow individually and tighten up on the outer rim, once cooled the outer rim would be completely loose as stainless steel has very low thermal conductivity and grows rapidly in the heated zone. This is different from higher conductivity metals such as aluminium with quick heat spread that evens out the movement in a wider zone. It was this reason I wanted to make the entire spoked structure and then once complete, weld it to the outer rim. This ensured the spokes were all normalized and not fighting the rim, the last process was welding them to the rim on the truing stand to ensure they were true to each other and then the smaller webs were added to finish things up.

With a Firestone Clincher 28×3 slick fitted up to the 22 inch front rim, it was time to move onto the rear, but I couldn’t stop looking at the front. I vowed that I would not fit the front wheel till the rear was complete to get the full effect. With the spoke structure complete on the rear I could break the tacks to normalize the spokes and true the rim before welding. A dial indicator is perfect for this and I had both wheels within 1mm. keep in mind that these outer rims are fabricated from sheet metal so they were naturally around .8mm out anyway.

The Final Product
With the rear complete I was blown away. In the beginning, I was going to run an old rear drum brake drive system but after building the motor components for performance I deemed it too weak and reverted back to the stock R Nine T drive unit. This meant a 5 stud rear wheel and subsequently, a 5 spoke design. With the 22 inch front and 18 inch rear, I knew the proportions would be just right. With the rim complete and true I waited for it to cool and fitted up my M&H Racemaster rear slick, I had this leftover from my Landspeed Record bike as I never used it due to a lack of speed ratings on it. With the tyre on and pumped up I could go ahead and fit both wheels to the bike.

With the biggest part of the puzzle complete, I stood back and took in the sight that was a complete motorcycle. I was a little overwhelmed, I put my tools away and hung up the leads on the welder, this bike was a massive job and none of the work would be worth it if I didn’t feel butterflies in my stomach when completed. The magnitude of effort and thought that I have put into these two components alone overshadows the whole bike.
Remember the staggering cost of those 5th axis CNC Rims I spoke about at the beginning of this article? Well these cost me just under $1,000 in materials. Hours wise I probably spent a good 30 hours broken up into many different sessions to allow for cooling, I found the time to do it because I believed in the process and the outcome, would I ever do it again? Probably not until I get that burning passion to produce something this unique again. That said, the bike is a work of art and together they complete the picture that I had in my mind years ago.
Want to start your own fabrication journey building skills to enable you to achieve your own project goals? The Motorsport Fabrication Fundamentals course is the perfect choice for you.